
There’s something truly magical about a cookie that practically melts in your mouth, isn’t there? For me, these Whipped Shortbread Cookies bring back memories of cozy holiday afternoons, baking with my grandma. She always had a batch ready for unexpected guests, and the buttery aroma filling her kitchen was pure comfort. This recipe is my go-to when I want to share a little bit of that warmth and simple joy with my own family and friends. They are just so wonderfully tender and easy to make!

Why You’ll Love These Whipped Shortbread Cookies
- They have an incredible melt-in-your-mouth texture that’s simply irresistible.
- You only need a few basic pantry ingredients to whip them up.
- The flavor is pure, buttery goodness, perfect for any occasion.
- They’re surprisingly easy to make, even for beginner bakers!
Ingredients You’ll Need
- Unsalted Butter: This is the star of the show! Make sure it’s softened to room temperature so it creams beautifully with the sugar. Unsalted butter gives you control over the saltiness.
- Powdered Sugar: Also known as confectioners’ sugar, it gives these cookies their delicate, tender texture. Granulated sugar would make them too crisp.
- Vanilla Extract: Use pure vanilla extract for the best flavor. It adds a lovely warmth to the cookies.
- Table Salt: Don’t skip the salt! It balances the sweetness and enhances all the other flavors.
- All-Purpose Flour: Standard all-purpose flour works perfectly here.
- Cornstarch: This secret ingredient is what gives the shortbread its signature melt-in-your-mouth texture. It makes the cookies extra tender.
How to Make Whipped Shortbread Cookies Step by Step
First things first, let’s get your oven ready! Preheat it to 325°F (165°C) and grab a baking sheet. Line it with parchment paper – this helps prevent sticking and makes cleanup a breeze. Now, set that aside for a moment.
Next, we’re going to create that dreamy, whipped butter base. In your stand mixer bowl, combine the softened butter and powdered sugar. Beat them on medium-high speed until the mixture is light in color, wonderfully fluffy, and creamy. This will take at least 5 minutes with a stand mixer, so be patient – this is where the magic happens! If you’re using a hand mixer, you might need a bit longer and use high speed. Make sure to scrape down the sides and bottom of the bowl occasionally to get everything incorporated.
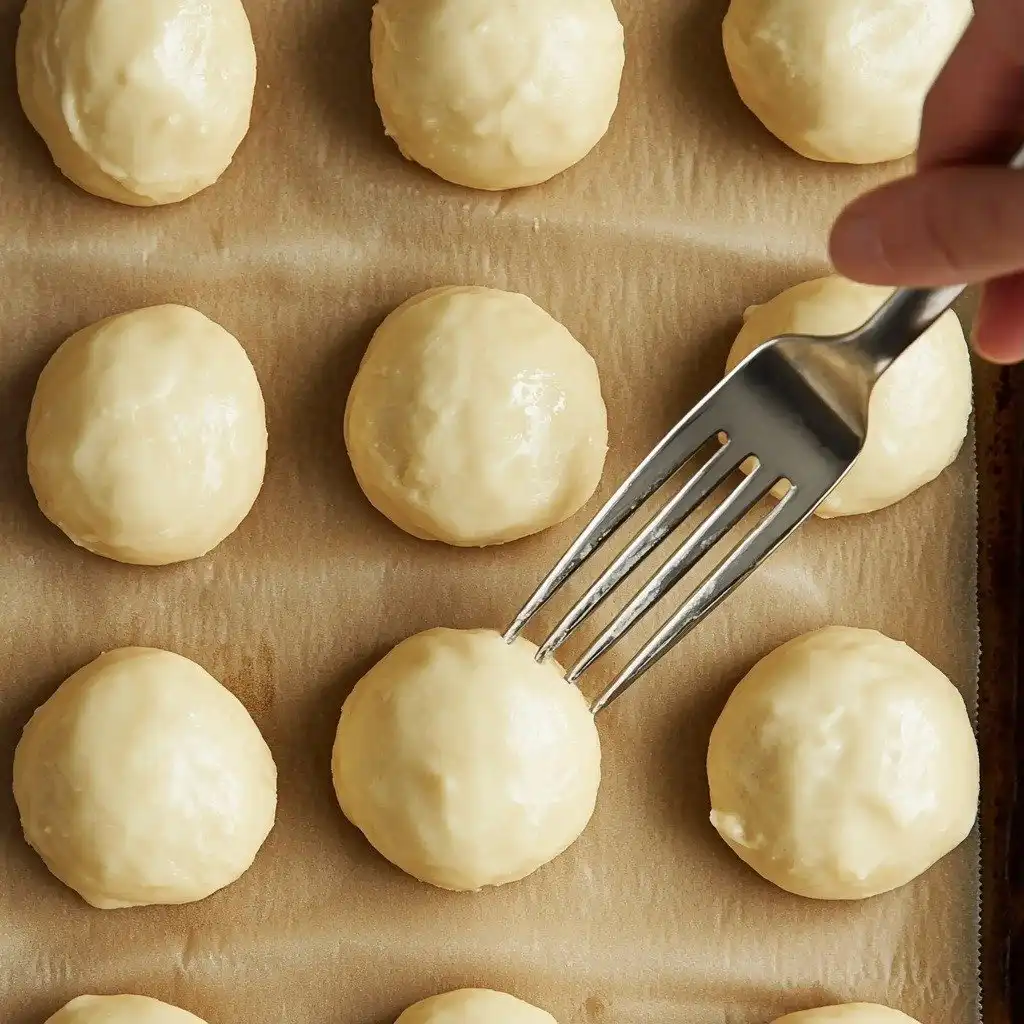
Once your butter and sugar are perfectly whipped, add the vanilla extract and salt. Stir just until everything is combined. In a separate bowl, whisk together your flour and cornstarch. Now, with your mixer on medium-low speed, gradually add the dry flour mixture to the wet ingredients. Mix just until it’s combined – you don’t want to overmix shortbread dough, or it can become tough. Scoop out tablespoon-sized portions of dough and roll them briefly between your palms to form smooth balls. Place them on your prepared baking sheet, leaving about 1-2 inches (2.5-5cm) between each cookie. Gently flatten each cookie with a fork. If the dough starts to stick, just dip your fork in a little powdered sugar. If you like, sprinkle with nonpareils, jimmies, or colored sanding sugar for a festive touch!
My Top Tips for Success
- Use softened butter: I always make sure my butter is truly at room temperature. This is key for that light, whipped texture.
- Don’t skimp on whipping: In my experience, beating the butter and sugar for the full 5 minutes (or more!) makes all the difference in the cookie’s texture.
- Measure flour correctly: Trust me on this one – spoon your flour into the measuring cup and then level it off. Scooping directly can add too much flour.
- Don’t overmix: As soon as the flour is combined, stop mixing. Overmixing develops gluten, which can make shortbread tough.
- Cool completely on the sheet: These cookies are delicate when warm. I always let them cool completely on the baking sheet before moving them, or they might break.
Common Mistakes to Avoid
Using cold butter:
If your butter is too cold, it won’t cream properly with the sugar, leading to a dense cookie. Make sure it’s genuinely softened.Not whipping butter enough:
Under-whipping the butter and sugar means less air is incorporated, resulting in a heavier, less tender cookie. Beat until light and fluffy.Overmixing the dough:
Once the flour is added, mixing too much develops gluten, which can make your shortbread tough instead of melt-in-your-mouth. Mix only until just combined.Baking at too high a temperature:
Shortbread bakes low and slow. Too high a temperature can cause them to brown too much or become dry. Stick to 325°F (165°C).Removing from baking sheet too soon:
These cookies are fragile when warm. Moving them before they are fully cooled can cause them to crumble.
How to Store Whipped Shortbread Cookies
- Airtight container at room temperature: Up to 1 week. Keep them in a sealed container to maintain freshness.
- Freezer (baked): Up to 3 months. Place cooled cookies in a single layer in an airtight container or freezer bag, separated by parchment paper.
- Freezer (dough): Up to 3 months. Form dough balls, then freeze on a tray until solid. Transfer to a freezer bag. Bake from frozen, adding a few minutes to the bake time.
Frequently Asked Questions
What makes these cookies “whipped”?
The “whipped” in Whipped Shortbread Cookies comes from thoroughly beating the butter and powdered sugar together until they are light, fluffy, and creamy. This process incorporates air, giving the cookies their signature delicate, melt-in-your-mouth texture.
Can I make these cookies ahead of time?
Yes, absolutely! The baked cookies store wonderfully in an airtight container at room temperature for up to a week. You can also freeze the baked cookies or even the unbaked dough balls for longer storage.
Why did my cookies spread too much?
Cookies spreading too much can happen if your butter was too soft (almost melted) or if your dough wasn’t chilled enough. Ensure your butter is softened but still cool to the touch, and don’t bake on warm baking sheets.
Can I use granulated sugar instead of powdered sugar?
No, I don’t recommend using granulated sugar. Powdered sugar is crucial for the tender, melt-in-your-mouth texture of these Whipped Shortbread Cookies. Granulated sugar would result in a much crispier and less delicate cookie.
My cookies are crumbly, what went wrong?
Crumbly cookies can be a sign of too much flour or not enough mixing of the initial butter and sugar. Ensure your flour is measured accurately and that the butter and sugar are thoroughly whipped to create a cohesive base.
I truly hope you give these Whipped Shortbread Cookies a try! They’re such a simple pleasure, and I think you’ll fall in love with their delicate texture and buttery flavor. If you make them, please let me know how they turn out – I always love hearing from you!
PrintWhipped Shortbread Cookies

These delicate, melt-in-your-mouth Whipped Shortbread Cookies are a classic for a reason, perfect for any occasion.
- Prep Time: 20
- Cook Time: 12
- Total Time: 32
- Yield: 24 cookies
- Category: Dessert
- Method: Baking
- Cuisine: American
Ingredients
- 1 cup (226 g) unsalted butter
- ¾ cup (90 g) powdered sugar
- 1 teaspoon vanilla extract
- ¾ teaspoon table salt
- 2 cups (250 g) all-purpose flour
- 2 Tablespoons (17 g) cornstarch
- Nonpareils jimmies, or colored sanding sugar for decorating, optional
Instructions
- Preheat your oven to 325°F (165°C).
- Line a baking sheet with parchment paper and set it aside.
- Combine the softened unsalted butter and powdered sugar in the bowl of a stand mixer.
- Beat the butter and powdered sugar on medium-high speed until the mixture is lightened in color, fluffy, and creamy. This will take at least 5 minutes with a stand mixer (use high speed if using a hand mixer).
- Pause occasionally to scrape the sides and bottom of the bowl to ensure all ingredients are well creamed.
- Add the vanilla extract and table salt to the whipped butter mixture.
- Stir until the vanilla and salt are just combined.
- In a separate medium bowl, whisk together the all-purpose flour and cornstarch.
- Turn your mixer speed to medium-low.
- Gradually add the whisked flour and cornstarch mixture to the wet ingredients.
- Mix until the flour is just combined into the dough.
- Scoop the dough into tablespoon-sized portions.
- Briefly roll each scoop of dough between your palms to form smooth balls.
- Place the dough balls on the prepared baking sheet, spacing them 1-2 inches (2.5-5cm) apart.
- Use a fork to gently and slightly flatten each cookie.
- If the dough sticks to the fork, dip the fork tines in a bit of powdered sugar before flattening.
- Sprinkle the cookies with nonpareils, jimmies, or colored sanding sugar, if desired.
- Transfer the baking sheet to the preheated 325°F (165°C) oven.
- Bake for 12 minutes. The cookies will still be light in color when they are finished baking.
- Allow the cookies to cool completely on the baking sheet before removing them to a wire rack or serving.
Notes
Ensure butter is properly softened but not melted for the best texture.
Whip butter and sugar for the full recommended time to incorporate enough air.
Measure flour accurately by spooning it into the cup and leveling off.
Avoid overmixing the dough once flour is added to keep cookies tender.


