
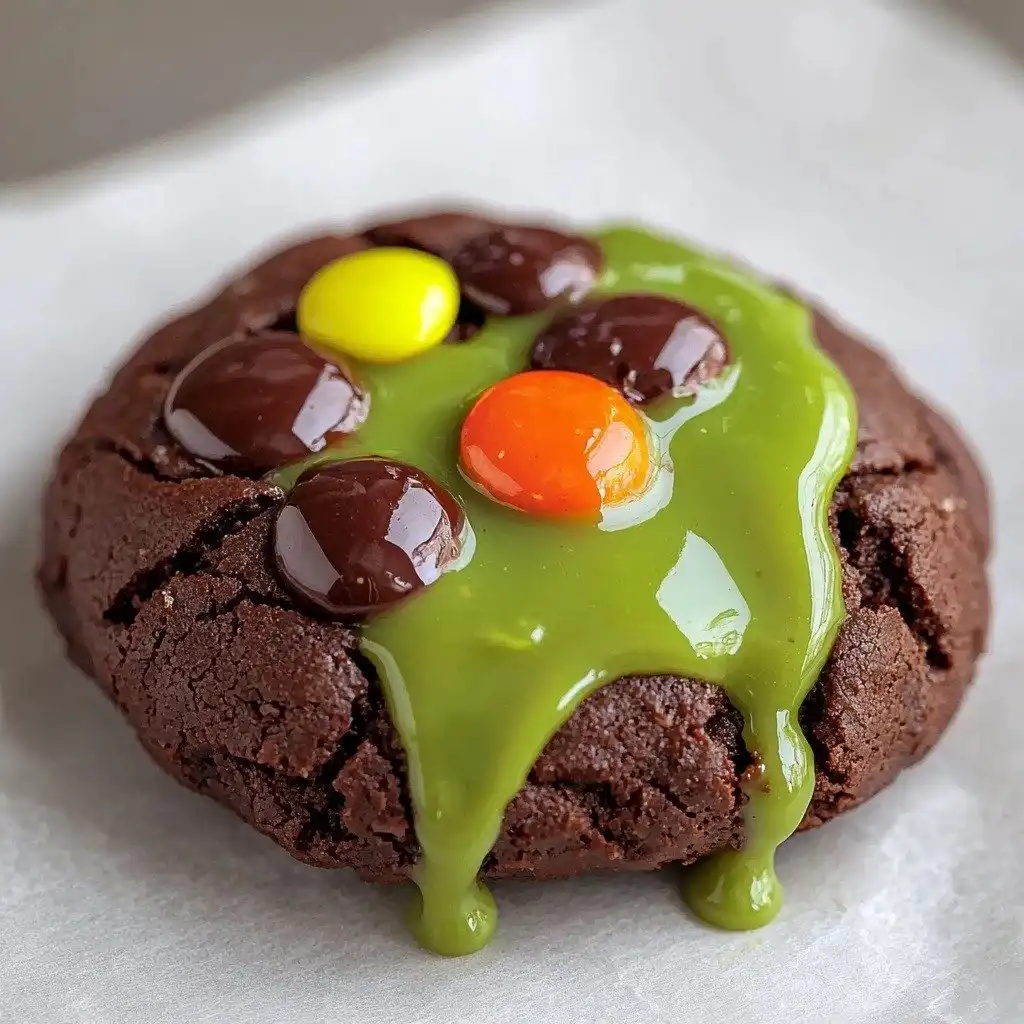
Every Halloween, my kitchen transforms into a mad scientist’s lab, and it’s one of my favorite traditions! There’s just something so fun about making spooky treats that are both delicious and a little bit ghoulish. These Slime Filled Halloween Cookies are absolutely perfect for that. They’re rich, chocolatey, and have a surprise gooey green center that always gets a reaction!

Why You’ll Love These Slime Filled Halloween Cookies
- They’re super festive and fun for Halloween parties or just a cozy night in.
- The chocolate cookies are soft, chewy, and packed with M&M’s.
- That surprise “slime” filling makes them extra exciting and delicious!
- They look impressive but are surprisingly easy to make, even for beginners.
Ingredients You’ll Need
- Sweet Cream Unsalted Butter: Using unsalted butter lets you control the salt content in your cookies. Make sure it’s at room temperature for easy creaming!
- Brown Sugar: Packed brown sugar adds moisture and a lovely caramel note to the cookies, making them extra chewy.
- Unsweetened Cocoa Powder: This gives our cookies their deep, rich chocolate flavor and dark color. Don’t use Dutch-processed unless the recipe specifies, as it can affect how the baking soda reacts.
- Baking Soda: This is our leavening agent, helping the cookies rise and creating that perfect soft texture.
- White Frosting: You’ll want a standard tub of white frosting for this. It’s the base for our spooky green slime!
- Neon Green Gel Food Coloring: Gel food coloring gives a much more vibrant color without thinning out your frosting like liquid drops can.
- M&M Candies (orange, green, and purple): These add a festive crunch and burst of color.
How to Make Slime Filled Halloween Cookies Step by Step
First things first, let’s get our oven ready! Preheat it to 350°F. While that’s heating up, grab a cookie sheet and line it with parchment paper or a non-stick silicone mat. This makes cleanup so much easier and helps prevent sticking.
Now for the cookie dough! In one bowl, sift together your flour, baking soda, salt, and cocoa powder. This helps ensure everything is evenly distributed. In a separate, larger bowl, use an electric mixer to cream together your room temperature butter and both kinds of sugar until they’re light and fluffy. This step is crucial for a tender cookie! Then, beat in your eggs one at a time, followed by the vanilla. Now, slowly add your dry ingredients into the wet mixture, mixing just until everything is combined. Don’t overmix!
This is where the fun begins with the M&M’s! Add about half of your orange, green, and purple M&M’s into the dough and stir them in. Then, scoop out your dough into generously sized 2-inch balls. As you form each ball, press the remaining M&M’s onto the outside – this makes them look extra pretty once baked. Pop them into the preheated oven for 9-11 minutes. They might seem a little soft when you pull them out, but that’s okay! Let them cool slightly on the cookie sheet for a few minutes before transferring them to a wire rack to cool completely. This helps them set up perfectly.
My Top Tips for Success
- I always make sure my butter and eggs are at room temperature. It makes a huge difference in the texture of the cookies!
- Don’t overmix the cookie dough once you add the dry ingredients – just mix until combined. Overmixing can lead to tough cookies.
- Trust me on this one, use gel food coloring for the frosting. It gives a much more vibrant “slime” color without making the frosting too runny.
- When injecting the frosting, poke the side of the cookie carefully. You want to see just a small crack on top to know it’s full, but not so much that it bursts.
- Cool your cookies completely before filling them! Warm cookies will melt the frosting and make a mess.
Common Mistakes to Avoid
- Overmixing the dough: This develops the gluten too much, leading to tough, dense cookies instead of soft, chewy ones. Mix only until the ingredients are just combined.
- Baking cookies on a hot sheet: If you’re baking multiple batches, make sure your cookie sheet has cooled down between batches. Placing dough on a hot sheet will cause them to spread too quickly.
- Not cooling cookies completely before filling: Warm cookies will cause the frosting to melt and run, creating a gooey mess rather than a contained “slime” center.
- Using liquid food coloring: Liquid food coloring can thin out your frosting too much, making it harder to inject and potentially causing the cookies to get soggy. Stick to gel!
- Overfilling the cookies: Inject just until you see a small crack on the top. Too much frosting will cause the cookie to burst open messily.
How to Store Slime Filled Halloween Cookies
- Countertop: Store in an airtight container at room temperature for up to 3-4 days.
- Refrigerator: For slightly longer storage, you can keep them in an airtight container in the fridge for up to a week.
- Freezer: Unfilled cookies can be frozen for up to 3 months. Thaw at room temperature before filling. Filled cookies can also be frozen, but the texture of the frosting might change slightly upon thawing.
Frequently Asked Questions
Can I make these cookies ahead of time?
Yes, you can! You can make the cookie dough and chill it for up to 3 days, or freeze the dough balls for up to 3 months. You can also bake the cookies and freeze them unfilled.
What if I don’t have a flavor injector?
You can try using a piping bag with a small round tip, but it might be harder to get the frosting deeply into the cookie without it bursting. A flavor injector really is best for this recipe.
Can I use a different color for the “slime”?
Absolutely! Feel free to use any spooky color you like – purple, orange, or even black would be fun. Just make sure it’s gel food coloring.
My cookies are spreading too much, what went wrong?
This often happens if your butter was too soft (melted) or if your oven temperature is off. Make sure your butter is just softened, not melted, and consider chilling the dough balls for 15-20 minutes before baking.
I hope these Slime Filled Halloween Cookies bring as much spooky joy and deliciousness to your kitchen as they do to mine. They’re such a fun project and always a hit! If you make them, I’d love to hear how they turned out in the comments below!
PrintSlime Filled Halloween Cookies

Rich, chocolatey cookies loaded with M&M’s and a spooky green slime filling, perfect for Halloween fun!
- Prep Time: 20
- Cook Time: 10
- Total Time: 30
- Yield: 24 cookies
- Category: Dessert
- Method: Baking
- Cuisine: American
- Diet: Vegetarian
Ingredients
- 1 Cup Sweet Cream Unsalted Butter
- 3/4 Cup Sugar
- 2/3 Cup Packed Brown Sugar
- 2 Eggs large
- 1 tsp Vanilla
- 2 1/4 Cup Flour
- 2/3 Cup Unsweetened Cocoa Powder
- 1 tsp Baking Soda
- 1/4 tsp Salt
- 16 oz White Frosting
- 5 drops Neon Green Gel Food Coloring
- M&M Candies orange, green, and purple
Instructions
- Preheat your oven to 350°F (175°C).
- Line a cookie sheet with parchment paper or a non-stick silicone baking mat.
- Separate the orange, green, and purple M&M’s into a small bowl.
- In a mixing bowl, sift together the flour, baking soda, salt, and cocoa powder.
- In a separate large mixing bowl, use an electric mixer to cream the room temperature butter and both the granulated sugar and packed brown sugar together until light and fluffy.
- Add the large eggs one at a time to the butter mixture, mixing well after each addition.
- Stir in the vanilla extract.
- Slowly pour the dry ingredients mixture into the wet ingredients mixture, mixing with the electric mixer until just combined. Do not overmix.
- Add about half of your separated M&M’s to the cookie dough and stir them in gently.
- Form the dough into balls, each about 2 inches in size.
- Press the remaining M&M’s onto the top and sides of each round cookie dough ball.
- Place the cookie dough balls onto the prepared cookie sheet.
- Bake at 350°F (175°C) for 9-11 minutes, or until the edges are set and the centers are still slightly soft.
- Remove the cookies from the oven and allow them to cool slightly on the cookie sheet for a few minutes.
- Carefully transfer the partially cooled cookies to a wire rack to finish cooling completely.
- Scoop the white frosting into a microwave-safe bowl.
- Heat the frosting in the microwave for 15 seconds to soften it slightly.
- Stir in the 5 drops of neon green gel food coloring until the frosting is a bright, uniform green color.
- Insert the needle of a flavor injector into the green frosting.
- Pull the knob up on the injector to fill it with the green frosting.
- Poke the side of a completely cooled cookie with the flavor injector needle.
- Slowly inject frosting into the cookie until you see just a small crack appear on the top surface of the cookie.
- Repeat this filling process until all cookies are injected with the green frosting.
Notes
Ensure butter and eggs are at room temperature for the best cookie texture.
Use gel food coloring for vibrant slime without thinning the frosting.
Cool cookies completely before filling to prevent the frosting from melting.
Do not overfill the cookies; inject just until a small crack appears on top.
Store cookies in an airtight container to keep them fresh and soft.


