Easy Gluten Free Sandwich Bread
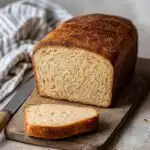
A truly soft, fluffy, and perfectly structured gluten-free sandwich bread that’s easy to make and tastes amazing.
- Prep Time: 25
- Cook Time: 70
- Total Time: 190
- Yield: 1 loaf (about 12 slices)
- Category: Baking
- Method: Baking
- Cuisine: American
- Diet: Gluten-Free
Ingredients
Scale
- 20 g (4 tbsp) whole psyllium husk
- 280 g (1 cup + 2½ tbsp) lukewarm water
- 230 g (2 cups) tapioca starch
- 135 g (1 cup) millet flour
- 60 g (⅓ cup + 2 tbsp) sorghum flour
- 50 g (¼ cup) caster/superfine or granulated sugar
- 8 g (2½ tsp) instant yeast
- 8 g (2 tsp) baking powder
- 7 g (2¾ tsp) xanthan gum
- 12 g (2 tsp) salt
- 120 g (½ cup) whole milk, lukewarm
- 2 US large/UK medium eggs, room temperature
- 25 g (2 tbsp) sunflower oil
- 1 US large/UK medium egg white, whisked
Instructions
- Make the psyllium gel: In a bowl, mix together the psyllium husk and lukewarm water.
- Allow the mixture to sit for 30-45 seconds until a gel forms.
- In a large bowl or the bowl of a stand mixer, whisk together the tapioca starch, millet flour, sorghum flour, sugar, instant yeast, baking powder, xanthan gum and salt.
- Add the lukewarm milk, room temperature eggs, and sunflower oil to the psyllium gel mixture.
- Mix the wet ingredients well to combine.
- Make a well in the middle of the dry ingredients.
- Pour the psyllium gel-egg mixture into the well of the dry ingredients.
- Knead the dough until smooth and all ingredients are evenly incorporated (4-5 minutes with a stand mixer, 6-8 minutes by hand).
- Use a rubber spatula to occasionally scrape along the sides and bottom of the bowl to prevent any dry patches of unmixed flour.
- Turn out the dough onto a generously floured surface.
- Dust the top of the dough with flour as well.
- Use floured hands to gently knead the dough and shape it into a smooth ball.
- Use the palms of your hands to gently press the dough into a log shape that fits snugly into a 9×5-inch (23x13cm) loaf pan.
- Carefully transfer the shaped bread into the ungreased loaf pan.
- Use a bread lame or a sharp knife to score the bread with 3 diagonal slashes.
- Lightly cover the loaf pan with a sheet of plastic wrap to prevent the bread from drying out.
- Proof the bread in a warm spot until doubled in size, about 1 hour 15 minutes to 1 hour 30 minutes.
- After the bread has been proofing for about 45 minutes, preheat your oven to 400ºF (200ºC).
- Place a baking steel, baking stone, or heavy-duty baking sheet on the bottom (lowest) oven rack while the oven preheats.
- Once the sandwich bread has doubled in size, gently brush it with the whisked egg white.
- Place the loaf pan directly onto the preheated baking steel (or stone or heavy-duty baking sheet).
- Bake at 400ºF (200ºC) for about 1 hour to 1 hour 10 minutes.
- Bake until the bread is deep golden brown on top, the bottom and side crust is crisp, and the bread weighs about 960-970g.
- If the top of your loaf starts browning too much, cover it with a sheet of aluminium foil (shiny side up) and continue baking.
- Immediately out of the oven, transfer the sandwich bread onto a wire rack to cool.
- Cool the bread completely to room temperature (or at least until lukewarm) before slicing.
Notes
Always use lukewarm liquids (water and milk) to properly activate the yeast and create the psyllium gel.
Do not add extra flour to the dough itself, even if it feels very sticky; rely on generously flouring your work surface and hands.
Scoring the bread before proofing helps it rise evenly and prevents cracking, giving a smooth top crust.
Allow the bread to cool completely on a wire rack before slicing to ensure the internal structure sets properly and prevents a gummy texture.
Find it online: https://theopenoven.com/easy-gluten-free-sandwich-bread/